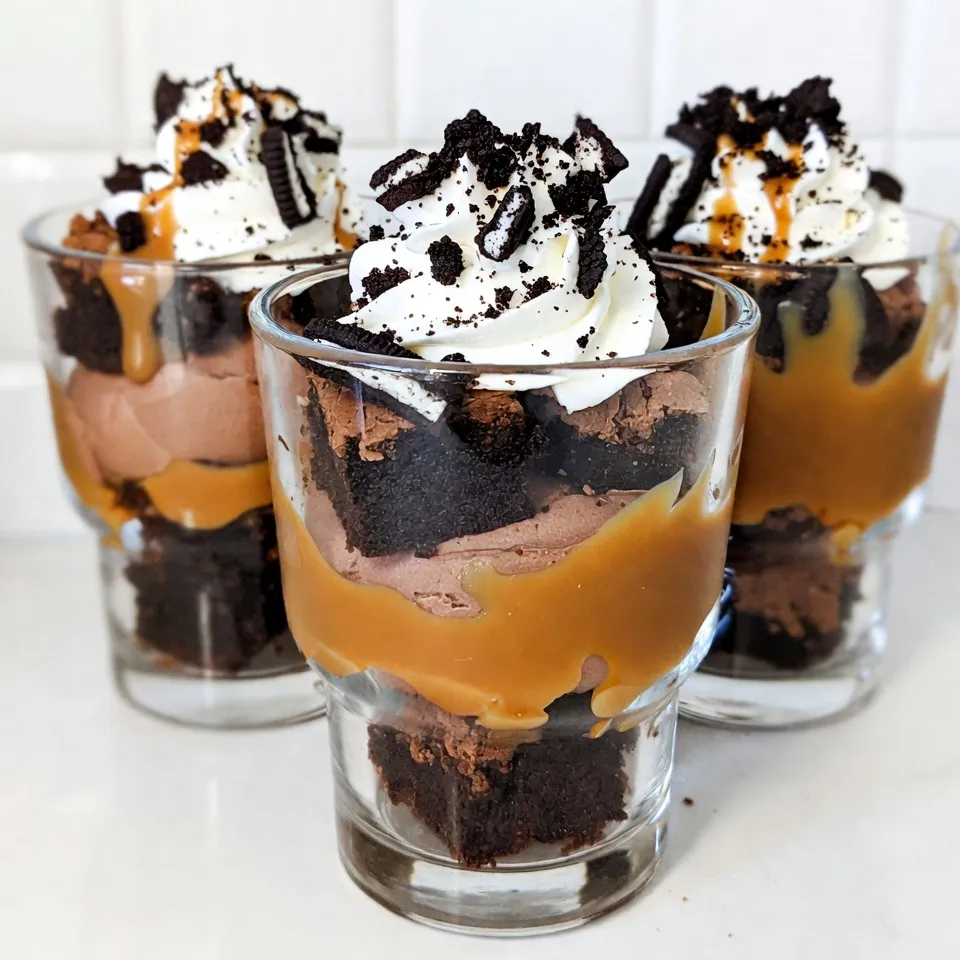
If you’re craving a dessert that stands out, the Salted Caramel Brownie Trifle is the answer. This treat layers rich brownies, creamy whipped topping, and luscious salted caramel for a sweet explosion in every bite. You’ll impress friends and family with this easy-to-make dish that looks stunning too. Let’s dive into the delicious details to create this irresistible dessert together!
Why I Love This Recipe
- Decadent Layers: This trifle is a delightful combination of rich brownie layers, creamy mousse, and fluffy whipped cream that creates a perfect dessert experience.
- Easy to Assemble: With simple ingredients and straightforward instructions, you can assemble this show-stopping dessert in no time, making it perfect for gatherings.
- Customizable: Feel free to add your favorite toppings or adjust layers to your liking, whether it’s adding nuts, different cookies, or more caramel sauce.
- Perfect for Any Occasion: This salted caramel brownie trifle is ideal for birthdays, holidays, or just a cozy night in, satisfying all the sweet cravings.
Ingredients
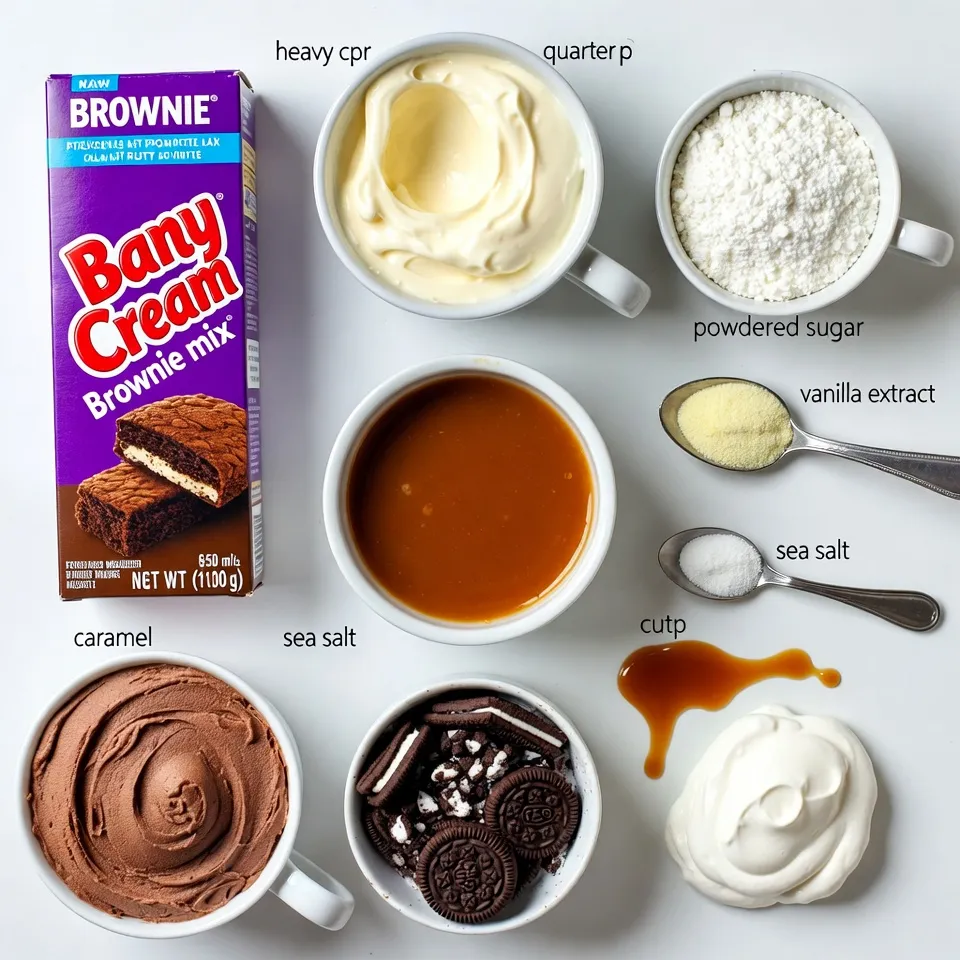
Brownie Mix and Essentials
To make the base of your trifle, grab:
– 1 box of brownie mix (follow the box for extra items)
– Water, eggs, and oil (for the brownie mix)
These brownies will bring a rich chocolate taste to your trifle. Follow the box instructions and bake them perfectly. Let them cool before cutting them into squares.
Whipped Cream Ingredients
Next, we need to make the fluffy whipped cream. Gather these items:
– 1 cup heavy cream
– 1/4 cup powdered sugar
– 1 teaspoon vanilla extract
Whipping this cream adds a light touch to the trifle. Beat these ingredients together until soft peaks form. This will give you a nice, airy texture.
Salted Caramel Component
Now, let’s add that delicious salted caramel. You need:
– 1 cup caramel sauce (you can buy it or make it)
– 1/2 teaspoon sea salt
Mix the caramel sauce with sea salt to create a sweet-salty flavor. This will enhance the taste of your trifle. It’s important to balance these flavors for the perfect bite.
Step-by-Step Instructions
Preparing the Brownies
To start, preheat your oven. Follow the instructions on the brownie mix box. Gather the eggs, oil, and water needed for the mix. Mix all the ingredients well in a bowl. Pour the batter into a greased baking dish. Bake until a toothpick comes out clean. This usually takes about 20 to 25 minutes. Once baked, let the brownies cool completely. After cooling, cut them into small squares.
Making the Whipped Cream
Now, let’s whip up some cream. In a medium bowl, add 1 cup of heavy cream. Then add 1/4 cup of powdered sugar and 1 teaspoon of vanilla extract. Using an electric mixer, beat the mixture. Keep mixing until you see soft peaks form. This should take about 3 to 5 minutes. Be careful not to overmix it, or it will get too thick.
Creating the Salted Caramel Sauce
Next, we’ll prepare the salted caramel sauce. If you use store-bought caramel, it’s ready to go. If you want homemade, heat 1 cup of sugar in a pan. Stir until it melts and turns amber. Then, slowly add 1/2 cup of heavy cream while stirring. Finally, mix in 1/2 teaspoon of sea salt. This adds a rich sweet and salty flavor. Let this cool slightly before using it in the trifle.
Assembling the Salted Caramel Brownie Trifle
Layering the Ingredients
To start, grab your brownie squares. Place them at the bottom of your dish. Next, drizzle a layer of the salted caramel sauce over the brownies. The sweetness with a hint of salt makes it special. Then, add a layer of chocolate mousse for a rich flavor. Follow this with a layer of whipped cream. Repeat these layers until your dish is full. Finish with a layer of whipped cream on top.
Final Touches for Presentation
For a lovely finish, sprinkle crushed Oreo cookies on the top layer. This adds a nice crunch. You can also drizzle more caramel sauce over everything. This creates a beautiful and tempting dessert. A light sprinkle of sea salt can enhance the flavor and look. Using clear glass cups to serve is great. It shows off those pretty layers.
Serving Suggestions
Serve the salted caramel brownie trifle right after you finish assembling. It tastes best fresh. Each guest can have their own cup for easy serving. Pair it with coffee or tea for a delightful end to any meal. If you like, add a scoop of vanilla ice cream on the side for extra joy. Enjoy every bite!
Pro Tips
- Use Quality Ingredients: Opt for high-quality chocolate and caramel sauce for the best flavor. The richness of these ingredients will elevate your trifle.
- Let Brownies Cool Completely: Ensure your brownies are completely cooled before cutting them into squares. This prevents them from crumbling and makes layering easier.
- Customize Layers: Feel free to add other layers such as fresh fruits or different flavored mousse. This adds variety and creates a unique twist on the classic trifle.
- Chill Before Serving: Allow the assembled trifle to chill in the refrigerator for at least 30 minutes. This helps the flavors meld together and makes it even more delicious.
Tips & Tricks
Enhancing Flavor Combinations
To boost flavors, consider adding a touch of espresso powder to your brownie mix. It makes your chocolate taste richer. You can also mix in some nuts for crunch. Walnuts or pecans add a nice texture. If you like fruit, try adding fresh raspberries between the layers. Their tartness contrasts well with the sweet caramel.
Perfecting the Layers
Layering is key for a great trifle. Start with brownie squares at the bottom. Make sure they are cool for easy layering. Next, spread the salted caramel sauce evenly. Follow with chocolate mousse for that creamy texture. Then, add whipped cream for lightness. Repeat until you reach the top. Finish with whipped cream and a caramel drizzle. This creates a stunning visual that wows everyone.
Storage Tips for Leftovers
If you have leftovers, store them in the fridge with a lid. Enjoy them within two days for the best taste. Keep extra caramel sauce in a separate container. This way, you can drizzle more on top before serving. Don’t freeze this trifle, as it may change the texture. Always serve chilled to keep it fresh and tasty.
Variations
Alternative Toppings
You can change up the toppings for your trifle. Instead of crushed Oreos, try crushed nuts or toffee bits. You can also use fresh fruit like strawberries or raspberries. These add a fresh twist to the dessert. You could even use cookie crumbles from different cookies for a fun mix.
Different Flavor Profiles
Want to switch up the flavors? Use peanut butter instead of caramel for a nutty treat. Chocolate syrup can replace caramel for a deeper chocolate flavor. If you love coffee, add espresso powder to the whipped cream. Each of these options gives your dessert a unique taste.
Gluten-Free and Dairy-Free Options
For gluten-free brownies, look for a gluten-free brownie mix. Many brands offer tasty options that work well. To make it dairy-free, use coconut cream instead of heavy cream. There are also dairy-free caramel sauces available. These swaps let everyone enjoy this delicious dessert.
FAQs
How long can I store the trifle?
You can store the trifle in the fridge for up to three days. After that, the layers may become soggy. Keep it covered with plastic wrap to keep it fresh. If you want to enjoy the trifle later, make the components separately. Then assemble them just before serving.
Can I make this dessert ahead of time?
Yes, you can make this dessert ahead. Prepare the brownies and whipped cream a day before. Keep them in airtight containers in the fridge. You can also mix the salted caramel sauce and store it separately. Assemble the trifle just before serving for the best taste and texture.
What can I substitute for caramel sauce?
If you don’t have caramel sauce, you can use chocolate sauce instead. You could also try butterscotch sauce for a different flavor. If you prefer, make your own caramel sauce using sugar, butter, and cream. This gives you control over the sweetness and texture.
This blog post covered how to make a scrumptious Salted Caramel Brownie Trifle. We explored the right ingredients and detailed steps for brownies, whipped cream, and caramel. You learned how to layer these treats for a beautiful dessert. I shared tips for enhancing flavors and keeping leftovers fresh. Plus, we discussed tasty variations for all diets. Enjoy creating this dessert, and impress your friends and family with every delicious laye