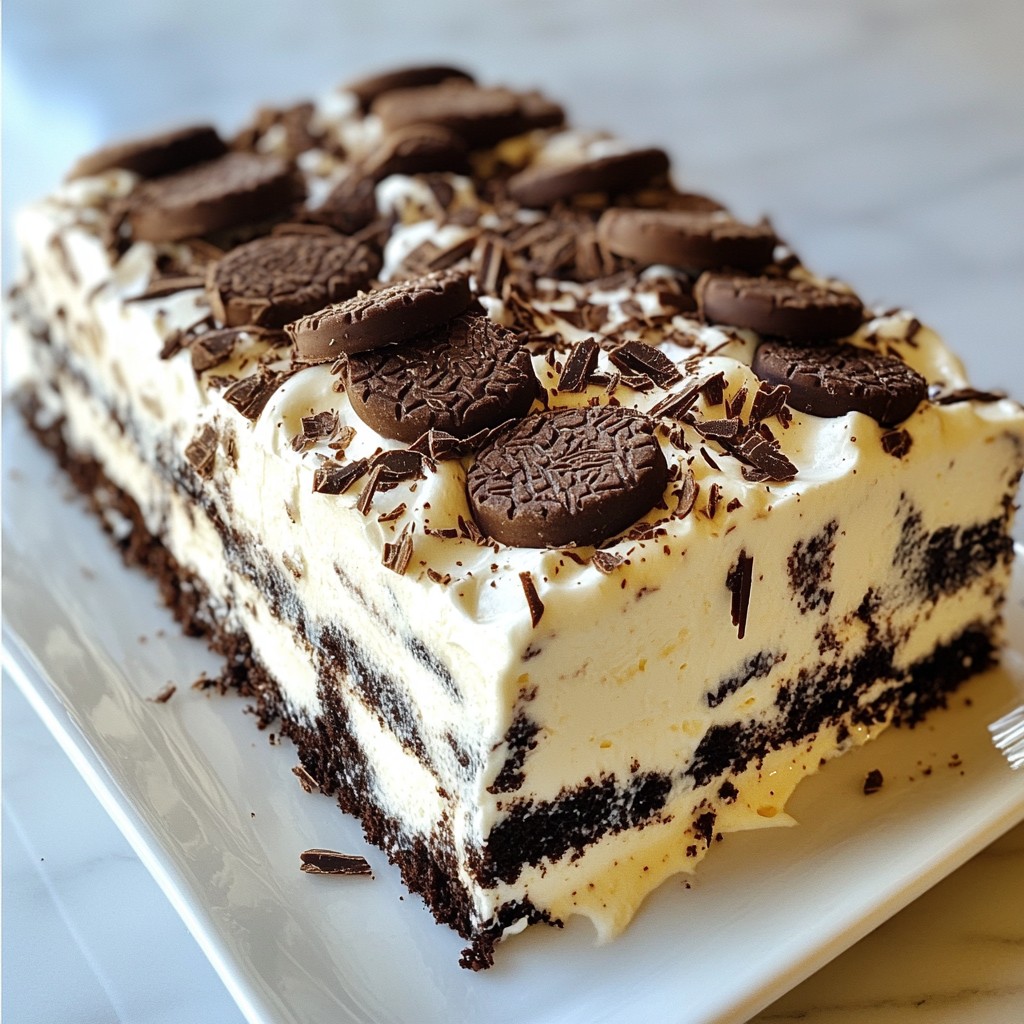
Craving a dessert that’s easy to make and impressively delicious? The Cookies and Cream Icebox Cake is the perfect choice! This no-bake treat layers sweet cream and crunchy cookies to create a dreamy delight. Whether you're serving it at a party or satisfying a sweet tooth at home, it’s a hit every time. Let me guide you through the simple steps and tips to make this delightful dessert treat unforgettable!
Why I Love This Recipe
- Decadent Flavor: This icebox cake combines the rich taste of chocolate cookies with the lightness of whipped cream, creating a delightful contrast that is simply irresistible.
- No-Bake Convenience: Perfect for hot days or busy schedules, this recipe requires no baking, making it an easy and hassle-free dessert option.
- Customizable Layers: You can personalize this cake by adding your favorite toppings or mix-ins, such as fresh berries or different flavored cookies.
- Make-Ahead Delight: This cake tastes even better after chilling overnight, allowing you to prepare it in advance and enjoy it whenever you like.
Ingredients
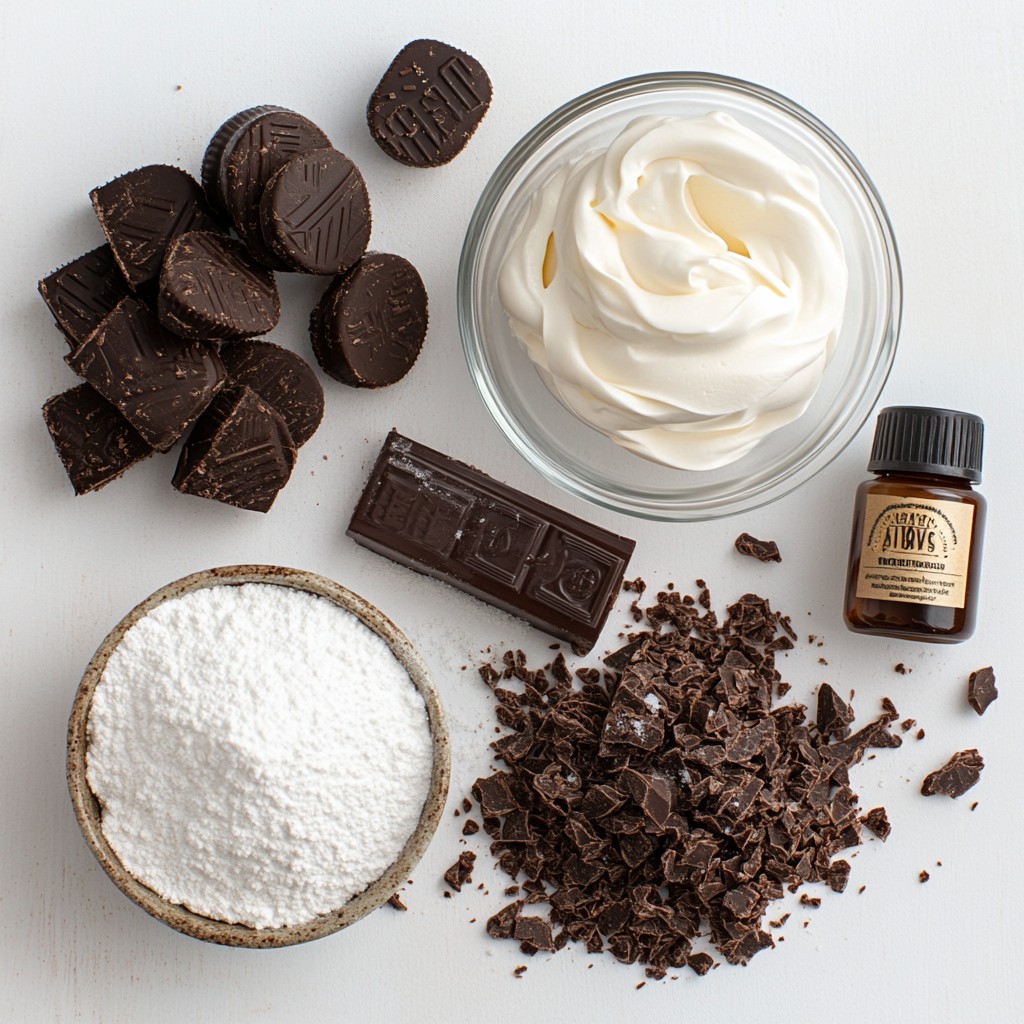
Detailed Ingredient List
To make a Cookies and Cream Icebox Cake, you need:
- 2 cups heavy whipping cream
- 1 cup powdered sugar
- 1 teaspoon vanilla extract
- 1 package (15 oz) chocolate sandwich cookies (like Oreos)
- 1 cup cream cheese, softened
- 1 cup chocolate cookie crumbs (from crushed Oreos)
- Optional: chocolate shavings or additional cookie crumbs for garnish
Each ingredient plays a key role in flavor and texture. The heavy cream gives a rich and creamy base. The powdered sugar sweetens the cream, while the vanilla adds aroma. Chocolate sandwich cookies bring that classic cookies and cream taste. Cream cheese adds a smooth texture, and the cookie crumbs enhance the crunch.
Substitutions for Dietary Preferences
If you're looking for swaps, here are some ideas:
- For a lighter option, use whipped topping instead of heavy cream.
- You can use a non-dairy cream cheese for a vegan version.
- To make it gluten-free, choose gluten-free chocolate sandwich cookies.
- For lower sugar, use a sugar substitute in place of powdered sugar.
These swaps allow you to enjoy this dessert while meeting dietary needs.
Tips for Selecting High-Quality Ingredients
Choosing top-notch ingredients is key. Here’s how:
- Heavy Cream: Look for cream with at least 36% fat for the best whip.
- Powdered Sugar: Check for freshness; older sugar can clump.
- Chocolate Cookies: Opt for name-brand cookies for consistent flavor.
- Cream Cheese: Select full-fat cream cheese for a rich and creamy filling.
Fresh, high-quality ingredients will elevate your Cookies and Cream Icebox Cake, making it a treat everyone will love.
Step-by-Step Instructions
Preparation of the Cream Mixture
Start by gathering your ingredients. You need heavy whipping cream, powdered sugar, vanilla extract, and softened cream cheese. In a large bowl, whip the heavy cream with an electric mixer. Mix until it thickens. Then, add the powdered sugar and vanilla. Keep mixing until soft peaks form. This means it should hold its shape but still be light and fluffy.
In another bowl, beat the cream cheese until smooth. This step is key! Next, gently fold the whipped cream mixture into the cream cheese. Make sure to combine until there are no streaks. This gives you a nice, airy cream filling.
Layering the Icebox Cake
Now, grab a 9x13-inch baking dish or a round cake pan. Start with a thin layer of the cream mixture on the bottom. This helps the cookies stick. Take your chocolate sandwich cookies and dip them in milk for just 1-2 seconds. Do not soak them! Place a layer of the dipped cookies over the cream layer.
Spread half of the cream mixture over the cookies. Smooth it out to the edges. Repeat this step: dip more cookies, layer them on top, and add more cream mixture. For the final layer, place the last layer of dipped cookies on top. Spread the remaining cream mixture over this layer.
Tips for Proper Chilling
Cover your dish with plastic wrap or aluminum foil. Refrigerate it for at least 4 hours, but overnight is better. This helps the cookies soften and meld with the cream. The longer it chills, the better the flavors blend. Before serving, you can add chocolate shavings or extra cookie crumbs on top for a nice touch.
This icebox cake is perfect for any gathering. You can slice it into squares or wedges. Add a dollop of whipped cream or some fresh berries for extra color and flavor!
Tips & Tricks
How to Achieve Perfect Whipped Cream
To get the best whipped cream, start with cold tools. Use a chilled bowl and beaters. This helps the cream whip faster. Pour 2 cups of heavy whipping cream into your bowl. Beat it on medium speed until it starts to thicken. Slowly add 1 cup of powdered sugar. Add 1 teaspoon of vanilla extract for flavor. Keep beating until soft peaks form. Don’t overwhip, or it will turn grainy.
Common Mistakes to Avoid
A few common mistakes can ruin your dessert. First, don’t soak the cookies too long. Just a quick dip works best. If you soak them, they become mushy. Next, avoid overmixing the whipped cream with the cream cheese. Gently fold them together until smooth. If you mix too hard, it will lose volume. Lastly, don’t skip the chilling time. Refrigerate for at least 4 hours, but overnight is better. This step makes the cake firm and tasty.
Enhancing Flavor with Variations
You can make this cake even more fun! Try adding flavors to the whipped cream. Mix in a tablespoon of espresso powder for a coffee twist. For a minty flavor, add mint extract instead of vanilla. You can also switch up the cookies. Use chocolate mint cookies or peanut butter cookies for a surprise. Don’t forget to garnish! Top with chocolate shavings or cookie crumbs for a nice touch. These small changes can make your cake unique and delightful.
Pro Tips
- Use Cold Ingredients: Ensure your heavy cream and cream cheese are cold before starting. This helps achieve a better volume when whipping the cream.
- Don’t Soak the Cookies: Briefly dipping the cookies in milk is key. Soaking them too long will make them too soggy, ruining the cake's texture.
- Chill Overnight: For the best flavor and texture, allow the cake to chill overnight. This gives the cookies time to soften and absorb the cream.
- Garnish for Presentation: Add chocolate shavings or additional cookie crumbs on top just before serving to elevate the presentation and add a bit of crunch.
Variations
Cookie Alternatives (Gluten-Free Options)
If you want a gluten-free treat, use gluten-free chocolate cookies. Brands like Glutino or Schar offer great options. These cookies work well in the icebox cake. Just dip them in milk like usual. The taste and texture remain fantastic, ensuring everyone enjoys the dessert. You can also make your own gluten-free cookies at home for a more personal touch.
Flavor Twist Ideas (Mint, Peanut Butter, etc.)
You can add fun flavors to your icebox cake. Try mixing in mint extract with the cream. This gives a refreshing mint chocolate taste. If you love peanut butter, blend creamy peanut butter into the cream mixture. This twist adds richness and depth to every bite. You can also use flavored cookies, like mint or peanut butter, for even more flavor options.
Different Toppings and Garnishes
Toppings can elevate your cake's look and taste. Use chocolate shavings for a fancy touch. Crushed cookies sprinkled on top add crunch. You might also consider fresh berries for a pop of color. Whipped cream dollops make each slice feel special. Get creative and mix different toppings to suit your taste!
Storage Information
Best Practices for Storing Leftovers
To keep your Cookies and Cream Icebox Cake fresh, cover it well. Use plastic wrap or aluminum foil. This helps prevent air from drying it out. Store it in the fridge. It stays cool and keeps its creamy texture. Make sure it doesn't touch any strong-smelling foods. This way, your cake keeps its yummy flavor.
Freezing the Cookies and Cream Icebox Cake
You can freeze this cake if you have extras. Slice it into pieces for easy serving. Wrap each piece in plastic wrap. Then, place them in a freezer bag. This helps to keep the cake safe from freezer burn. When you want to enjoy it again, just thaw it in the fridge. It tastes great even after freezing!
Shelf Life and Quality Tips
The Cookies and Cream Icebox Cake lasts about 3-4 days in the fridge. After that, it may start to lose its taste and texture. If you freeze it, it can last up to 2 months. However, for the best taste, eat it fresh. Always check for any signs of spoilage before serving. If it looks or smells off, it’s best to discard it. Enjoy your delightful dessert treat while it’s at its best!
FAQs
How long does it take for the Cookies and Cream Icebox Cake to set?
It takes at least 4 hours for the Cookies and Cream Icebox Cake to set. However, I recommend letting it chill overnight. This longer time helps the cookies absorb the cream. It makes the cake taste even better. The layers blend well, creating a creamy delight.
Can I make this dessert in advance?
Yes, you can make this dessert in advance. In fact, it tastes best when chilled overnight. This way, the flavors deepen and the texture becomes perfect. Just remember to cover it well with plastic wrap or foil. This keeps it fresh in the fridge. You can enjoy it anytime, ready for guests or family.
What can I substitute for the cream cheese?
If you want a substitute for cream cheese, try mascarpone. It has a similar texture and flavor. You can also use Greek yogurt for a lighter option. Just make sure it's plain and unsweetened. This will keep the taste balanced. Both options work well in this cake.
This blog post covered all you need to know for a Cookies and Cream Icebox Cake. We discussed key ingredients, how to prepare them, and tips for great results. I shared how to layer the cake, chill it properly, and avoid common mistakes. You now have ideas for variations and tasty toppings. Remember, great quality ingredients make a huge difference. Store leftovers smartly for the best taste. With this guide, you're set to impress your friends and family. Enjoy making this delicious dessert!