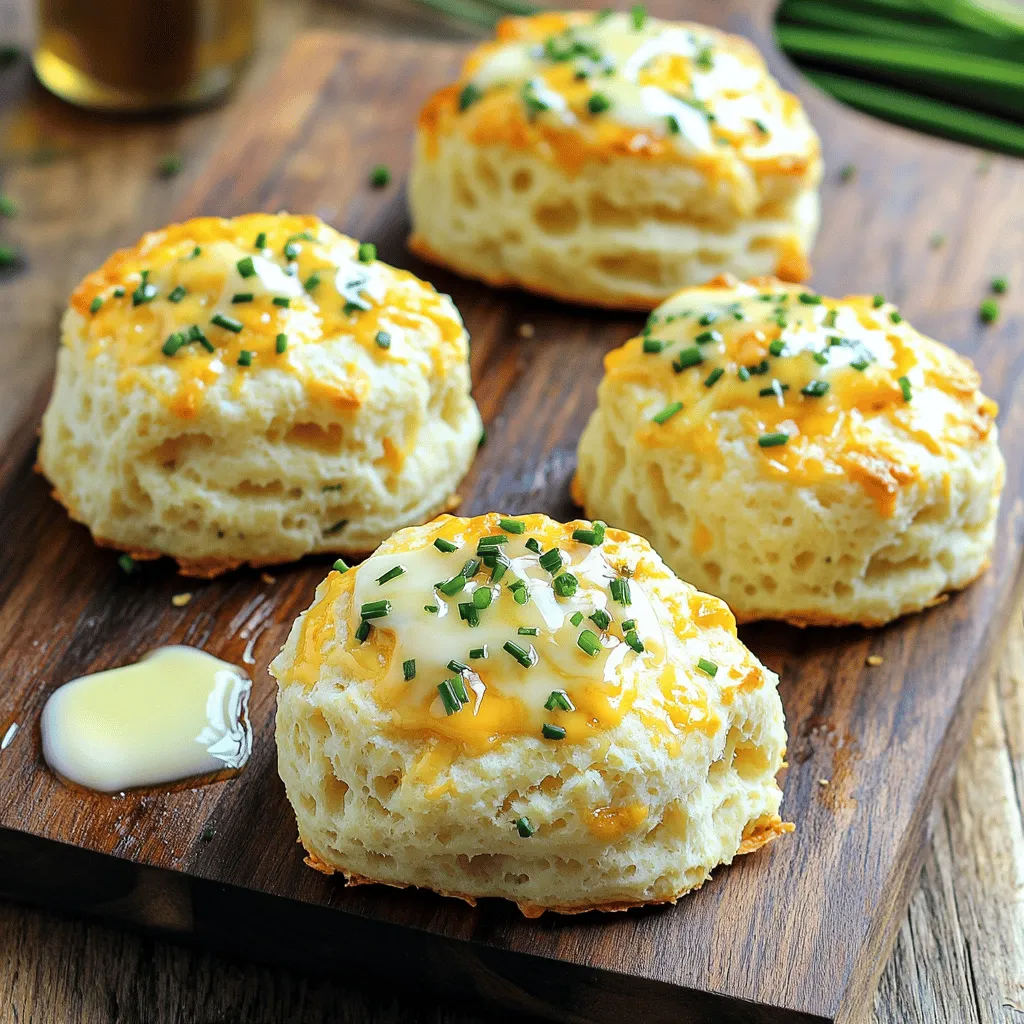
Looking for a quick and tasty snack? Cheddar Chive Drop Biscuits are your answer! These light, fluffy biscuits pack a flavorful punch and are super easy to make. With simple ingredients like sharp cheddar and fresh chives, you’ll have a delicious treat in no time. Whether you’re pairing them with soup or enjoying them alone, these biscuits will impress everyone. Ready to bake some? Let’s dive into the recipe!
Why I Love This Recipe
- Delicious Flavor Combination: The sharp cheddar and fresh chives create a savory and aromatic profile that pairs beautifully with any meal.
- Quick and Easy to Make: With just a few simple steps, you can whip up these biscuits in under 25 minutes, making them perfect for busy days.
- Versatile Serving Options: These drop biscuits are great on their own, or you can serve them with soups, salads, or as a side for dinner.
- Perfect for Any Occasion: Whether it’s a family gathering or a cozy brunch, these biscuits are sure to impress your guests.
Ingredients
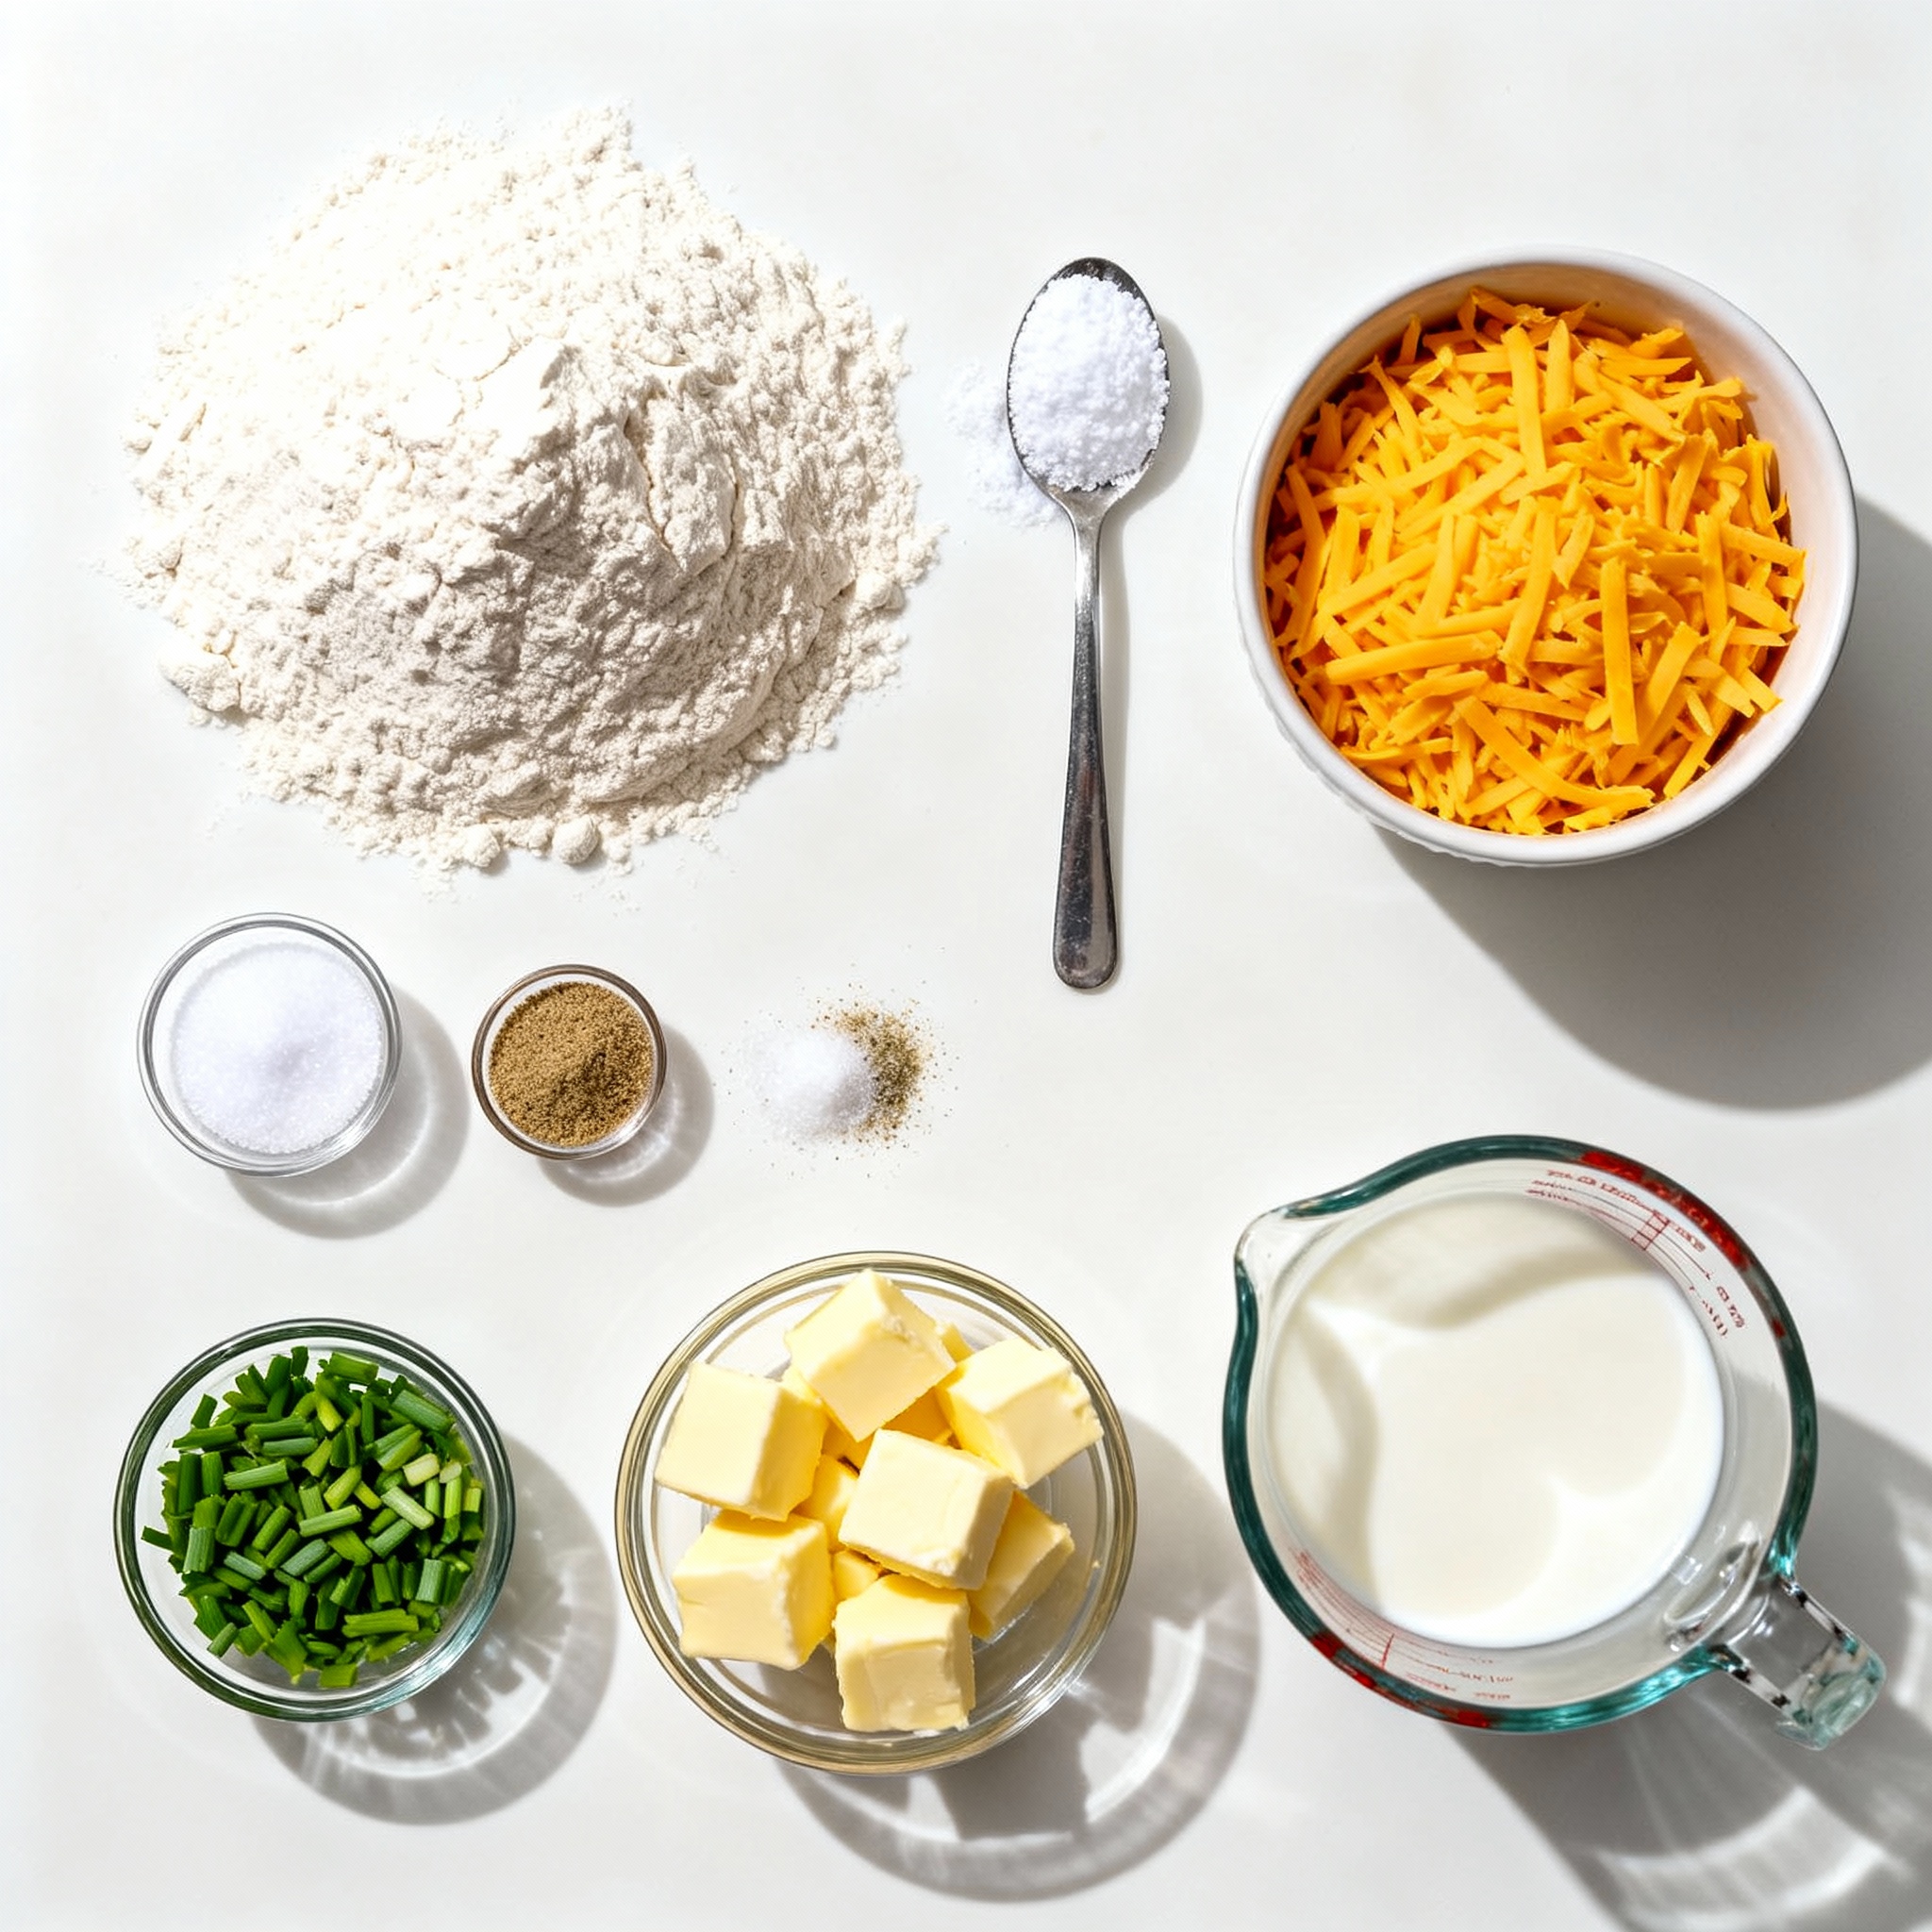
List of Ingredients Needed
– 2 cups all-purpose flour
– 1 tablespoon baking powder
– 1 teaspoon salt
– 1/2 teaspoon garlic powder
– 1 cup shredded sharp cheddar cheese
– 1/4 cup chopped fresh chives
– 1/4 cup cold butter, cubed
– 3/4 cup buttermilk (or milk with 1 tablespoon vinegar added)
When making Cheddar Chive Drop Biscuits, I ensure I have the right mix of ingredients. The base starts with all-purpose flour, which gives structure to the biscuits. Baking powder helps them rise, making them light and fluffy. I always add salt for flavor, plus garlic powder for a touch of savory goodness.
Cheddar cheese is the star of this recipe. I prefer sharp cheddar for its robust taste. Chives add a fresh, onion-like flavor that pairs perfectly with the cheese. Cold butter is key as it creates flaky layers. Lastly, buttermilk gives the biscuits moisture and tang. If I don’t have buttermilk, I mix regular milk with vinegar to get a similar effect.
Recommended Tools and Equipment
– Mixing bowls
– Baking sheet
– Parchment paper
– Pastry cutter or fork
– Measuring cups and spoons
Having the right tools makes the process smoother. I use mixing bowls to combine the dry ingredients and to mix in the wet ones. A baking sheet lined with parchment paper helps the biscuits cook evenly and prevents sticking.
A pastry cutter or fork is great for cutting in the butter. This tool helps break the butter into small pieces, which creates a nice texture. Measuring cups and spoons ensure I get the quantities just right. With these ingredients and tools, I can make delicious Cheddar Chive Drop Biscuits easily.
Step-by-Step Instructions
Preparation Steps
1. Preheat your oven to 425°F (220°C). This helps the biscuits rise nicely.
2. Line a baking sheet with parchment paper. This keeps the biscuits from sticking.
3. In a large bowl, whisk together the dry ingredients:
– 2 cups all-purpose flour
– 1 tablespoon baking powder
– 1 teaspoon salt
– 1/2 teaspoon garlic powder
Combining Ingredients
1. Gently fold in the cheese and chives to the flour mix. You want an even spread.
– 1 cup shredded sharp cheddar cheese
– 1/4 cup chopped fresh chives
2. Next, cut in the cold butter until the mix looks crumbly. Use a pastry cutter or your fingers. Don’t overmix; small butter chunks are okay.
– 1/4 cup cold butter, cubed
Finalizing the Dough
1. Make a well in the center of the mix. Pour in the buttermilk.
– 3/4 cup buttermilk (or milk with 1 tablespoon vinegar added)
2. Stir gently until just mixed. The dough should be a bit sticky.
3. Using a spoon, drop large spoonfuls onto the baking sheet. Leave some space between each mound. Aim for about 10-12 biscuits.
Baking and Cooling
1. Bake in the preheated oven for 12-15 minutes. Look for golden brown tops.
2. A toothpick inserted in the center should come out clean.
3. Let the biscuits cool slightly on the baking sheet before serving. Enjoy them warm!
Pro Tips
- Use Cold Ingredients: Ensure your butter and buttermilk are cold. This helps create flaky layers in the biscuits.
- Don’t Overmix: Mix the dough just until combined. Overmixing can lead to tough biscuits.
- Experiment with Cheese: Try different types of cheese like pepper jack or gouda for unique flavors.
- Keep an Eye on Baking Time: Ovens can vary; check your biscuits a minute or two early to prevent overbaking.
Tips & Tricks
Achieving Perfect Texture
To make great biscuits, avoid overmixing the dough. Overmixing can lead to tough biscuits. Mix just until the dough comes together. The dough should be sticky, not dry.
When cutting in butter, use a pastry cutter or your fingertips. You want the butter to stay in small chunks. This helps create flaky layers. Do not worry if some pieces are bigger than others.
Enhancing Flavor
To boost flavor, try adding other herbs. Fresh parsley or dill pair well with cheddar. You can also add a pinch of cayenne for heat. Experiment to find what you like best.
Pair your biscuits with sauces or spreads. A herbed butter or sour cream works well. You can also serve them with soups for a delicious meal.
Serving Suggestions
Present your biscuits on a rustic wooden board. Place them in a basket lined with cloth. This makes for a lovely display.
For best pairings, enjoy them with soups or salads. They also make great snacks on their own. Serve warm for the best taste and texture.
Variations
Ingredient Swaps
You can change the flavor of your biscuits by swapping the cheese. Try using mozzarella for a milder taste. Feta adds a salty kick. You can also mix it up with pepper jack for some heat.
Herbs can add a fresh twist. Instead of chives, use parsley for a bright flavor. Dill gives a nice earthy taste. You can even add a mix of herbs for depth.
Dietary Modifications
For those needing gluten-free options, use gluten-free flour blends. They work well in this recipe. Just make sure they have a good binding agent, like xanthan gum.
Vegan adaptations are easy too. Replace butter with plant-based margarine. Use almond or soy milk instead of buttermilk. These swaps will keep your biscuits soft and tasty.
Creative Serving Ideas
These biscuits can shine as sandwiches. Stuff them with your favorite meats and veggies. They make a great base for breakfast sandwiches.
You can also use them as appetizers. Top with cream cheese and smoked salmon. Serve with a side of dips like hummus or spinach-artichoke. The options are endless!
Storage Info
Storing Leftover Biscuits
To keep your leftover biscuits fresh, store them in an airtight container. Place them in the fridge if you plan to eat them within a few days. They will stay good for about three days this way. If you want to keep them longer, freezing is the best option.
To freeze biscuits, wrap each one in plastic wrap. Then, put them in a freezer bag or a sealed container. They can last in the freezer for up to three months. When you’re ready to enjoy them, just take out the desired amount and let them thaw.
Reheating Instructions
For the best taste, reheat biscuits in the oven. Preheat your oven to 350°F (175°C). Place the biscuits on a baking sheet and cover them with aluminum foil. Heat for about 10-15 minutes. This method keeps them warm and soft.
If you’re short on time, you can use the microwave. Place a biscuit on a microwave-safe plate. Cover it with a damp paper towel to keep it moist. Microwave for 15-30 seconds, checking to avoid overheating. This method works well, but it may not keep the biscuits as crispy.
FAQs
What is the difference between drop biscuits and regular biscuits?
Drop biscuits are quick and easy. You drop the dough onto a baking sheet. Regular biscuits require rolling and cutting. This adds time and effort. Drop biscuits are often lighter and fluffier. They use more liquid, making the dough sticky. This is why they drop instead of being shaped.
Can I make Cheddar Chive Drop Biscuits ahead of time?
Yes, you can make Cheddar Chive Drop Biscuits ahead. You can prepare the dough and store it in the fridge. This keeps them fresh for a day or two. When ready to bake, drop the dough onto the sheet and bake as usual. You can also bake them ahead and warm them later.
How do I know when my biscuits are done baking?
Your biscuits are done when the tops are golden brown. Insert a toothpick in the center. If it comes out clean, they are ready. They should also feel firm to the touch. Overbaking can make them dry, so watch closely.
Are Cheddar Chive Drop Biscuits freezable?
Yes, these biscuits freeze well. After baking, let them cool completely. Place them in a freezer-safe bag. They last for about three months. To enjoy, reheat them in the oven. This keeps them soft and warm.
What can I serve with Cheddar Chive Drop Biscuits?
Cheddar Chive Drop Biscuits pair well with many dishes. Serve them with soups, salads, or stews. They also work great with cheese spreads or butter. For a fun twist, make mini sandwiches. Fill them with meats, veggies, or spreads. Enjoy these biscuits any time!
In this post, I shared a simple recipe for Cheddar Chive Drop Biscuits. We covered essential ingredients, tools, and clear steps for baking. I also provided tips to achieve the best texture and flavor. You learned about variations and storage options as well.
Now it’s time to bake these delicious biscuits and enjoy them. They can be a tasty snack or a great side. Get creative when serving, and make them your own!
.png)